CMake is a tool for desribing the steps of building and linking software without tying that description to a specific toolchain. This makes it possible to create makefiles (or projects or whatever) that work for multiple systems. This description is put into a CMakeLists.txt using the declarative commands of the CMake scripting language.
Using either the CMake graphical user interface, commonly called cmake-gui, or the CMake command line tool scripts for a specific compiler toolchain can be created. These can accept input from the person building the software or search the system for a default compiler and tools. This is also the point where build options are specified. General build options like compiler flags or settings for debug, release and optimization can be. Robot specific options like choosing static or dynamic builds can be set here as well.
CMake strongly encourages out of source builds. Most conventional build systems encourage creating the build artifacts (object files, executables, etc...) in the same directories as the source. This has advantages if build artifacts are to be shared, but this has complications when trying to remove them, keep them outside version control or maintain multiple builds with the same source on the same machine. When using CMake the directory with the source code and the directory the will happen in must be specificied
CMake supports a ton of platforms and build tool chains. Here are some that were specifically targeted to work with Robot:
- Windows
- Visual Studio 14 - 2015
- MinGW with Ninja
- MinGW with Makefiles
- Visual Studio 12 - 2013 - (Experimental)
- Visual Studio 11 - 2012 - (Experimental)
- Visual Studio 10 - 2010 - (Experimental) *Linux
- Clang with Ninja
- Clang with Makefiles
- GCC with Ninja
- GCC with Makefiles
- Mac OS X - (Experimental)
- Clang - (Experimental)
- GCC - (Experimental)
You can read the official CMake Tutorial or get a brief versions here. Choose if you want to use the command like or the cmake-gui. The command line is easier to automate and can be called from your IDE, continuous integration system or other automation, but the cmake-gui could be easier to learn and allow easier access to options.
If you already have the Robot prerequisites and cmake installed here is the simplest way to prepare the build on one of the systems listed above:
git clone https://github.com/Robot/robot.git
mkdir robot-build
cd robot-build
cmake ../robot
Then depending on your platform and compiler toolchaing you can will use a command like one of the following to actually perform the build
make- Common Unix make.mingw32-make- Windows MinGW Makeninja- Google's high performance ninja build system.msbuild robot.sln- From a visual studio command on windows will invoke msvc.
This glosses over many important details.
The line cmake ../robot has many potential options. The folder being passed is the source directory and the current directory will be used as the output directory.
CMake uses Generators to decide what kinds of scripts to emit. If not specified it will perform a perfunctory check and attempt to emit some reasonable default. If you have a specific requirement you can check what generators are available on you system with 'cmake --help'. These can be used as follows:
For MinGW makefiles on windows:
cmake ../robot -G"MinGW Makefiles"
For Visual Studio 2015 on windows:
cmake ../robot -G"Visual Studio 14 2015"
For MinGW ninja on windows or Linux with ninja and GCC on most Linux distros:
cmake ../robot -G"Ninja"
Just passing -G and generator will determine what build system is used. This might determine the compiler as well, because not all build systems are compatible with all compilers. Some generators will provide different support for different IDEs like Eclipse, Code::Blocks, Borland and Codelite.
If you want to change any of the Useful CMake variables including CMAKE_BUILD_TYPE for debug/release or CMAKE_CXX_COMPILER for the compiler you can do this with the -D flag. If not specified a sane minimal setting for any variable will be used. Here are some examples for setting compiler flags in groups for debug or release optimization:
For release builds with reasonable optimization for the chosen compiler:
cmake ../robot -DCMAKE_BUILD_TYPE=Release
For debug builds with reasonable no optimizations:
cmake ../robot -DCMAKE_BUILD_TYPE=Debug
The variable CMAKE_CXX_FLAGS can be used for other flags on per compiler basis. For more possibilities see the Useful CMake variables page in the CMake documentation.
One option that was added custom in Robot is a switch for enabling or disabling static or dynamic build support. This defaults to building static libraries. It can be controlled by settings the BuildStatic CMake variable to "ON" or "OFF". Here is an example building dynamic libraries:
cmake ../robot -DBuildStatic=OFF
These options can be combined almost arbitrarily. The following example will build a release version of robot with the ninja build system and the clang compiler to make a dynamic library:
cmake ../robot -G"Ninja" -DCMAKE_BUILD_TYPE=Release -DCMAKE_CXX_COMPILER=clang -DBuildStatic=OFF
The GUI for CMake can be easier to use, but cannot readily be automated. For a single developer or small team just looking to build the software or interact with it the GUI is a good choice.
To use the GUI you will want to install cmake from the windows installer from the CMake Downloads Page or from the cmake-gui package from your system's package manager. This should install the command line tool and a program that shows a simple dialog window for setting CMake options.
There are 3 main parts to the CMake-gui.
The upper portion accepts input about where to retrieve source and where to leave build artifacts.
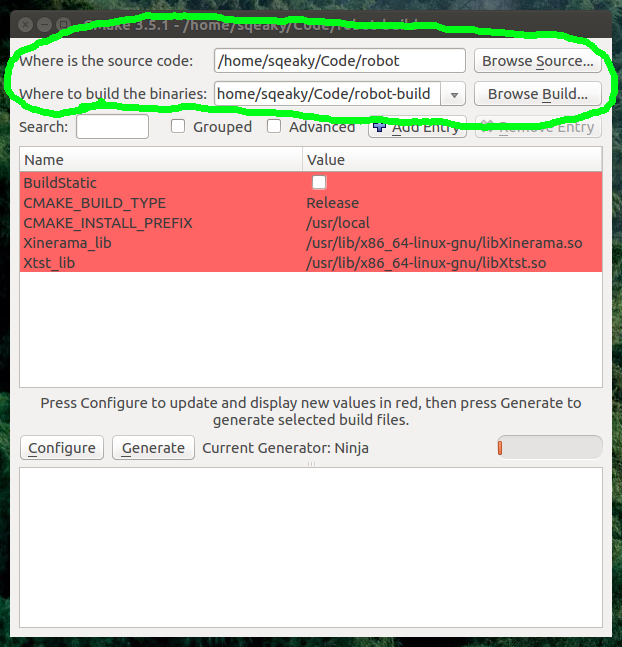
This is pretty self explanatory, put the folder with the source code you checked out in the first box. Then, put the folder you want your DLLs, SOs, EXEs, and BINs into the second box. These could be the same folder, but that needlessly complicates certain tasks (commiting to git, finding files, cleaning the build, etc...) and is considered poor form.
The middle area is concerned with setting CMake variables. The widgets above the large central box are for managing variables and changing the view of the central variables box
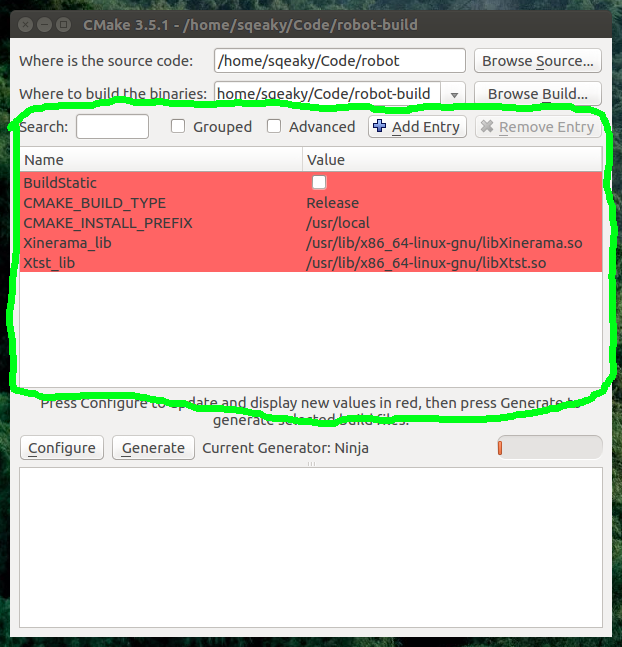
If your version of CMake has a search box it is for filtering the view of the list of variables because some projects have hundreds.
The "Grouped" and "Advanced" checkboxes are two other ways to change the view, and are generally not required for working with Robot. The "Grouped" checkbox changes the central box to list items like a tree, grouping everything with similar prefixes before their first underscore ("_"). Some projects prefix all their variables with something similar, this project only has 1 meaningful variable.
Any given CMake variable can be flagged as Advanced. Normally Advanced variables are not shown in the GUI, checking the "Advanced" box shows them. CMake creates many variables that can be used for fine tuning things like build options and file names. Sane default are chose for the Robot and these do not normally need to be adjusted.
The "Add Entry" button allows creation of new variables, but this generally has little effect unless a given project reads but never sets a variable, there are no extra variables that Robot will read that are not already shown. The "Remove Entry" button erases a variable, generally this can only cause problems, don't use this.
The central variable display will display each variable on its own line. The left will have the variable name and the right will have some way to adjust the variable. Boolean values will get a checkbox. String variables can have anything typed. Filename and Folder variables have a file entry box and can display a file chooser by clicking the elipses ("...") on their extreme right on most platforms.
Variables that are new are displayed in red, variables that have existed for at least one configuration run are displayed in white.
The bottom area includes buttons for making CMake run and displaying the results.
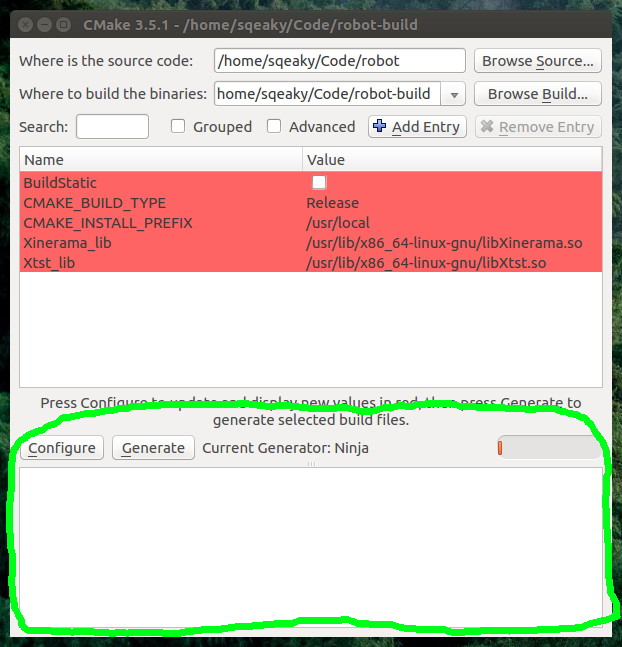
The large white output pane at the bottom is where almost all of the results will be shown. Errors and Warnings will show in red text and everything else in black.
The "Configure" button runs the CMake script in the CMakeLists.txt of the source folder, but does not emit any build scripts. This can be use for troubleshooting and not overwriting existing build scripts. If you click this and have not selected a "Generator" it will present you with a screen to select one. Robot is reasonably well test will the newer versions of GCC, Clang, Visual Studio and MinGW. Of course try others and let us know how it works out.
The "Generate" button will actually produce build files. Once this runs without error you should be able to use the results to build robot or open it in you build tools to hack on Robot.
There is also a progress bar in the bottom area on the right it is largely useless.
Once you open CMake first set the source and build folders. You will need to have the source code already checked out from github, CMake does not do that.
If no variables are displayed in the central box click configure and select a Generator/Toolchain to use for building robot. Be careful, it will let you select something non-sensical be sure you select a set of build tools you have installed and configured correctly. Generally this just means running the installer, but for some compiler you may need to add them to your system PATH environment variable.
Check BuildStatic if you want static libraries, uncheck if you want dynamic libraries.
To control the kind of build CMAKE_BUILD_TYPE can be set to "Release" or "Debug". "Release" enables extra compiler optimizations and "Debug" disables all optimization but adds debugging symbols to the final build results. There are more options, but these are the most common.
Once you are satisfied with the options hit the generate button and use the resulting build scripts.