







A Loopback4 based component to integrate a chat/LLM endpoint (powered by Mastra) in your application which can use any tool that you register using the provided decorator.
Version note — LLM backend
- Up to
v4.xthe component was backed by LangGraph.js / LangChain.- From
v5.xonwards it is backed by Mastra + the Vercel AI SDK.The public surface is preserved across the switch — the
@graphNode/@graphTooldecorators, theIGraphNode/IGraphToolinterfaces and theAiIntegrationBindings/DbQueryAIExtensionBindingsbinding keys are unchanged. Upgrading fromv4.xmainly means swapping the LangChain LLM provider packages for their AI SDK equivalents (see LLM Providers) and updating custom tools to return a plainGraphToolobject instead of a LangChaintool().
- Overview
- Installation
- Basic Usage
- LLM Providers — Ollama · Gemini · Cerebras · Anthropic · OpenAI · Bedrock · Groq · OpenRouter
- Limiters
- DbQueryComponent
- VisualizerComponent
- Providing Context
- Registering Models
- Connectors
- Default Conditions
- PgWithRlsConnector
- Writing Your Own Tool
- Overriding a Node
- Observability — Langsmith · Langfuse
- Testing
Install AiIntegrationsComponent using npm:
$ [npm install | yarn add] lb4-llm-chat-componentConfigure and load the AIIntegrations component in the application constructor as shown below.
import {AiIntegrationsComponent} from 'lb4-llm-chat-component';
// ...
export class MyApplication extends BootMixin(
  ServiceMixin(RepositoryMixin(RestApplication)),
) {
  constructor(options: ApplicationConfig = {}) {
    // could be any built-in provider (see below) or your own AI SDK compatible LLM provider
    // you can also have different LLM for different LLM type - cheap, smart and multimodal
    this.bind(AiIntegrationBindings.CheapLLM).toProvider(Ollama);
    this.bind(AiIntegrationBindings.SmartLLM).toProvider(Ollama);
    this.bind(AiIntegrationBindings.FileLLM).toProvider(Ollama);
    // configuration
    this.bind(AiIntegrationBindings.Config).to({
      // if not set to true, it will bind a ARC based sequence from @sourceloop/core with authentication and authorization
      useCustomSequence: true,
      // if not set to false, it will bind the core component from @sourceloop/core by default
      mountCore: false,
      // if not set to false, it will bind @sourceloop/file-utils component with defaults config
      mountFileUtils: false,
    });
    this.component(AiIntegrationsComponent);

    // ...
  }
  // ...
}Since v5.x the providers are thin wrappers around the Vercel AI SDK provider packages. Each provider is shipped as a subpath export of this package, so you install the matching AI SDK package and import the provider from lb4-llm-chat-component/<provider>.
To use the Ollama based models, install the package - ollama-ai-provider-v2 and update your application.ts -
import {Ollama, OllamaEmbedding} from 'lb4-llm-chat-component/ollama';

this.bind(AiIntegrationBindings.CheapLLM).toProvider(Ollama);
this.bind(AiIntegrationBindings.SmartLLM).toProvider(Ollama);
this.bind(AiIntegrationBindings.FileLLM).toProvider(Ollama);
this.bind(AiIntegrationBindings.EmbeddingModel).toProvider(OllamaEmbedding);To use the Gemini based models, install the package - @ai-sdk/google and update your application.ts -
import {Gemini, GeminiEmbedding} from 'lb4-llm-chat-component/google';

this.bind(AiIntegrationBindings.CheapLLM).toProvider(Gemini);
this.bind(AiIntegrationBindings.SmartLLM).toProvider(Gemini);
this.bind(AiIntegrationBindings.FileLLM).toProvider(Gemini);
this.bind(AiIntegrationBindings.EmbeddingModel).toProvider(GeminiEmbedding);To use the Cerebras based models, install the package - @ai-sdk/cerebras and update your application.ts -
import {Cerebras} from 'lb4-llm-chat-component/cerebras';

this.bind(AiIntegrationBindings.CheapLLM).toProvider(Cerebras);
this.bind(AiIntegrationBindings.SmartLLM).toProvider(Cerebras);
this.bind(AiIntegrationBindings.FileLLM).toProvider(Cerebras);To use the Anthropic (Claude) based models, install the package - @ai-sdk/anthropic and update your application.ts. The provider is exported as Claude -
import {Claude} from 'lb4-llm-chat-component/anthropic';

this.bind(AiIntegrationBindings.CheapLLM).toProvider(Claude);
this.bind(AiIntegrationBindings.SmartLLM).toProvider(Claude);
this.bind(AiIntegrationBindings.FileLLM).toProvider(Claude);To use the OpenAI models, install the package - @ai-sdk/openai and update your application.ts -
import {OpenAI} from 'lb4-llm-chat-component/openai';

this.bind(AiIntegrationBindings.CheapLLM).toProvider(OpenAI);
this.bind(AiIntegrationBindings.SmartLLM).toProvider(OpenAI);
this.bind(AiIntegrationBindings.FileLLM).toProvider(OpenAI);To use the Bedrock based models, install the package - @ai-sdk/amazon-bedrock and update your application.ts -
import {Bedrock, BedrockEmbedding} from 'lb4-llm-chat-component/aws';

this.bind(AiIntegrationBindings.CheapLLM).toProvider(Bedrock);
this.bind(AiIntegrationBindings.SmartLLM).toProvider(Bedrock);
this.bind(AiIntegrationBindings.FileLLM).toProvider(Bedrock);
this.bind(AiIntegrationBindings.EmbeddingModel).toProvider(BedrockEmbedding);
The AWS provider also exports
BedrockNonThinkingfor models where you want to disable extended thinking (used for theSmartNonThinkingLLMbinding).
To use the Groq based models, install the package - @ai-sdk/groq and update your application.ts -
import {Groq} from 'lb4-llm-chat-component/groq';

this.bind(AiIntegrationBindings.CheapLLM).toProvider(Groq);
this.bind(AiIntegrationBindings.SmartLLM).toProvider(Groq);
this.bind(AiIntegrationBindings.FileLLM).toProvider(Groq);To use the OpenRouter based models, install the package - @openrouter/ai-sdk-provider. The simplest setup is the same toProvider pattern as the other providers, which reads the OPENROUTER_MODEL / OPENROUTER_API_KEY (and optional OPENROUTER_BASE_URL, OPENROUTER_TEMPERATURE) env variables -
import {OpenRouter} from 'lb4-llm-chat-component/openrouter';

this.bind(AiIntegrationBindings.CheapLLM).toProvider(OpenRouter);
this.bind(AiIntegrationBindings.SmartLLM).toProvider(OpenRouter);
this.bind(AiIntegrationBindings.FileLLM).toProvider(OpenRouter);
For finer control - a different model per binding, reasoning options, or provider routing - use the static OpenRouter.createInstance(...) factory and bind the returned model with .to(...), as the reference reporting-service does -
import {OpenRouter} from 'lb4-llm-chat-component/openrouter';

this.bind(AiIntegrationBindings.SmartLLM).to(
  OpenRouter.createInstance({
    model: process.env.OPENROUTER_SMART_MODEL!,
    config: {
      apiKey: process.env.OPENROUTER_API_KEY,
      baseURL: process.env.OPENROUTER_BASE_URL,
      temperature: 0,
      // OpenRouter's native reasoning control
      reasoningEffort: 'high', // 'xhigh' | 'high' | 'medium' | 'low' | 'minimal' | 'none'
      reasoningSummary: 'concise', // 'auto' | 'concise' | 'detailed'
      // provider routing (preferred order / allow-list)
      provider: {order: ['cerebras', 'groq', 'google-vertex']},
    },
  }),
);
v5.xmodel-kwargs change (OpenRouter)On
v4.x,OpenRouter.createInstance({model, config})acceptedconfigasOmit<ChatOpenRouterInput, 'model'>— i.e. arbitrary LangChainChatOpenRouterkwargs spread straight intonew ChatOpenRouter({model, ...config}).On
v5.xthere is no LangChain model, soconfigis now a small explicit, typed object:apiKey,baseURL,temperature,reasoningEffort,reasoningSummary, andprovider({order, only}). Under the hood these are mapped to the AI SDK provider (createOpenRouter(...).chat(model, {reasoning: {effort, summary}, provider}), withtemperatureapplied via the model'sdefaultSettings). If you were passing other raw LangChain kwargs before, move them to these fields (reasoning/provider-routing are the common ones).
This binding would add an endpoint /generate in your service, that can answer user's query using the registered tools. By default, the module gives one set of tools through the DbQueryComponent
The package provides a way to limit the usage of the LLM Chat functionality by binding a provider on the key AiIntegrationBindings.LimitStrategy that follows the interface - ILimitStrategy.
The package comes with 3 strategies by default that are bound automatically on the basis of AiIntegrationBindings.Config -
- ChatCountStrategy - Applies limits per user based on number of chats. It is used if only
chatLimitandperiodis provided intokenCounterConfig. - TokenCountStrategy - Applies a fixed limit per user based on number of tokens used. It is used if
tokenLimitandperiodare provided withbufferTokenas optional field that determines how much buffer to keep while checking for token limit. - TokenCountPerUserStrategy - Applies token based limit similar to
TokenCountStrategyexcept the number of tokens comes from user permissionTokenUsage:NUMBERin the user's token. It applies if onlyperiodis set intokenCounterConfig, it also works withbufferTokenjust likeTokenCountStrategy.
This component provides a set of pre-built tools that can be plugged into any Loopback4 application -
- generate-query - this tool can be used by the LLM to generate a database query based on user's prompt. It will return a
DataSetinstead of the query directly to the LLM. - improve-query - this tool takes a
DataSet's id and feedback from the user, and uses it to modify the existingDataSetquery. Users can also vote on datasets via the dataset actions endpoint. - ask-about-dataset - this tool takes a
DataSet's id and a user prompt, and tries to answer user's question about the database query. Note that it can not run the query.
The component uses a dedicated chatbot schema with the following tables:
- datasets - Stores generated SQL queries with metadata including description, prompt, tables involved, and schema hash
- dataset_actions - Tracks user actions on datasets (votes, comments, improvements)
- chats - Stores chat sessions with metadata and token usage
- messages - Stores individual messages within chats
Users can provide feedback on generated datasets through the dataset actions endpoint. Each dataset can receive votes and comments, which can be used to improve future query generation. The system tracks:
- Vote count for each dataset
- User comments and suggestions
- Improvement history
- Creation and modification timestamps
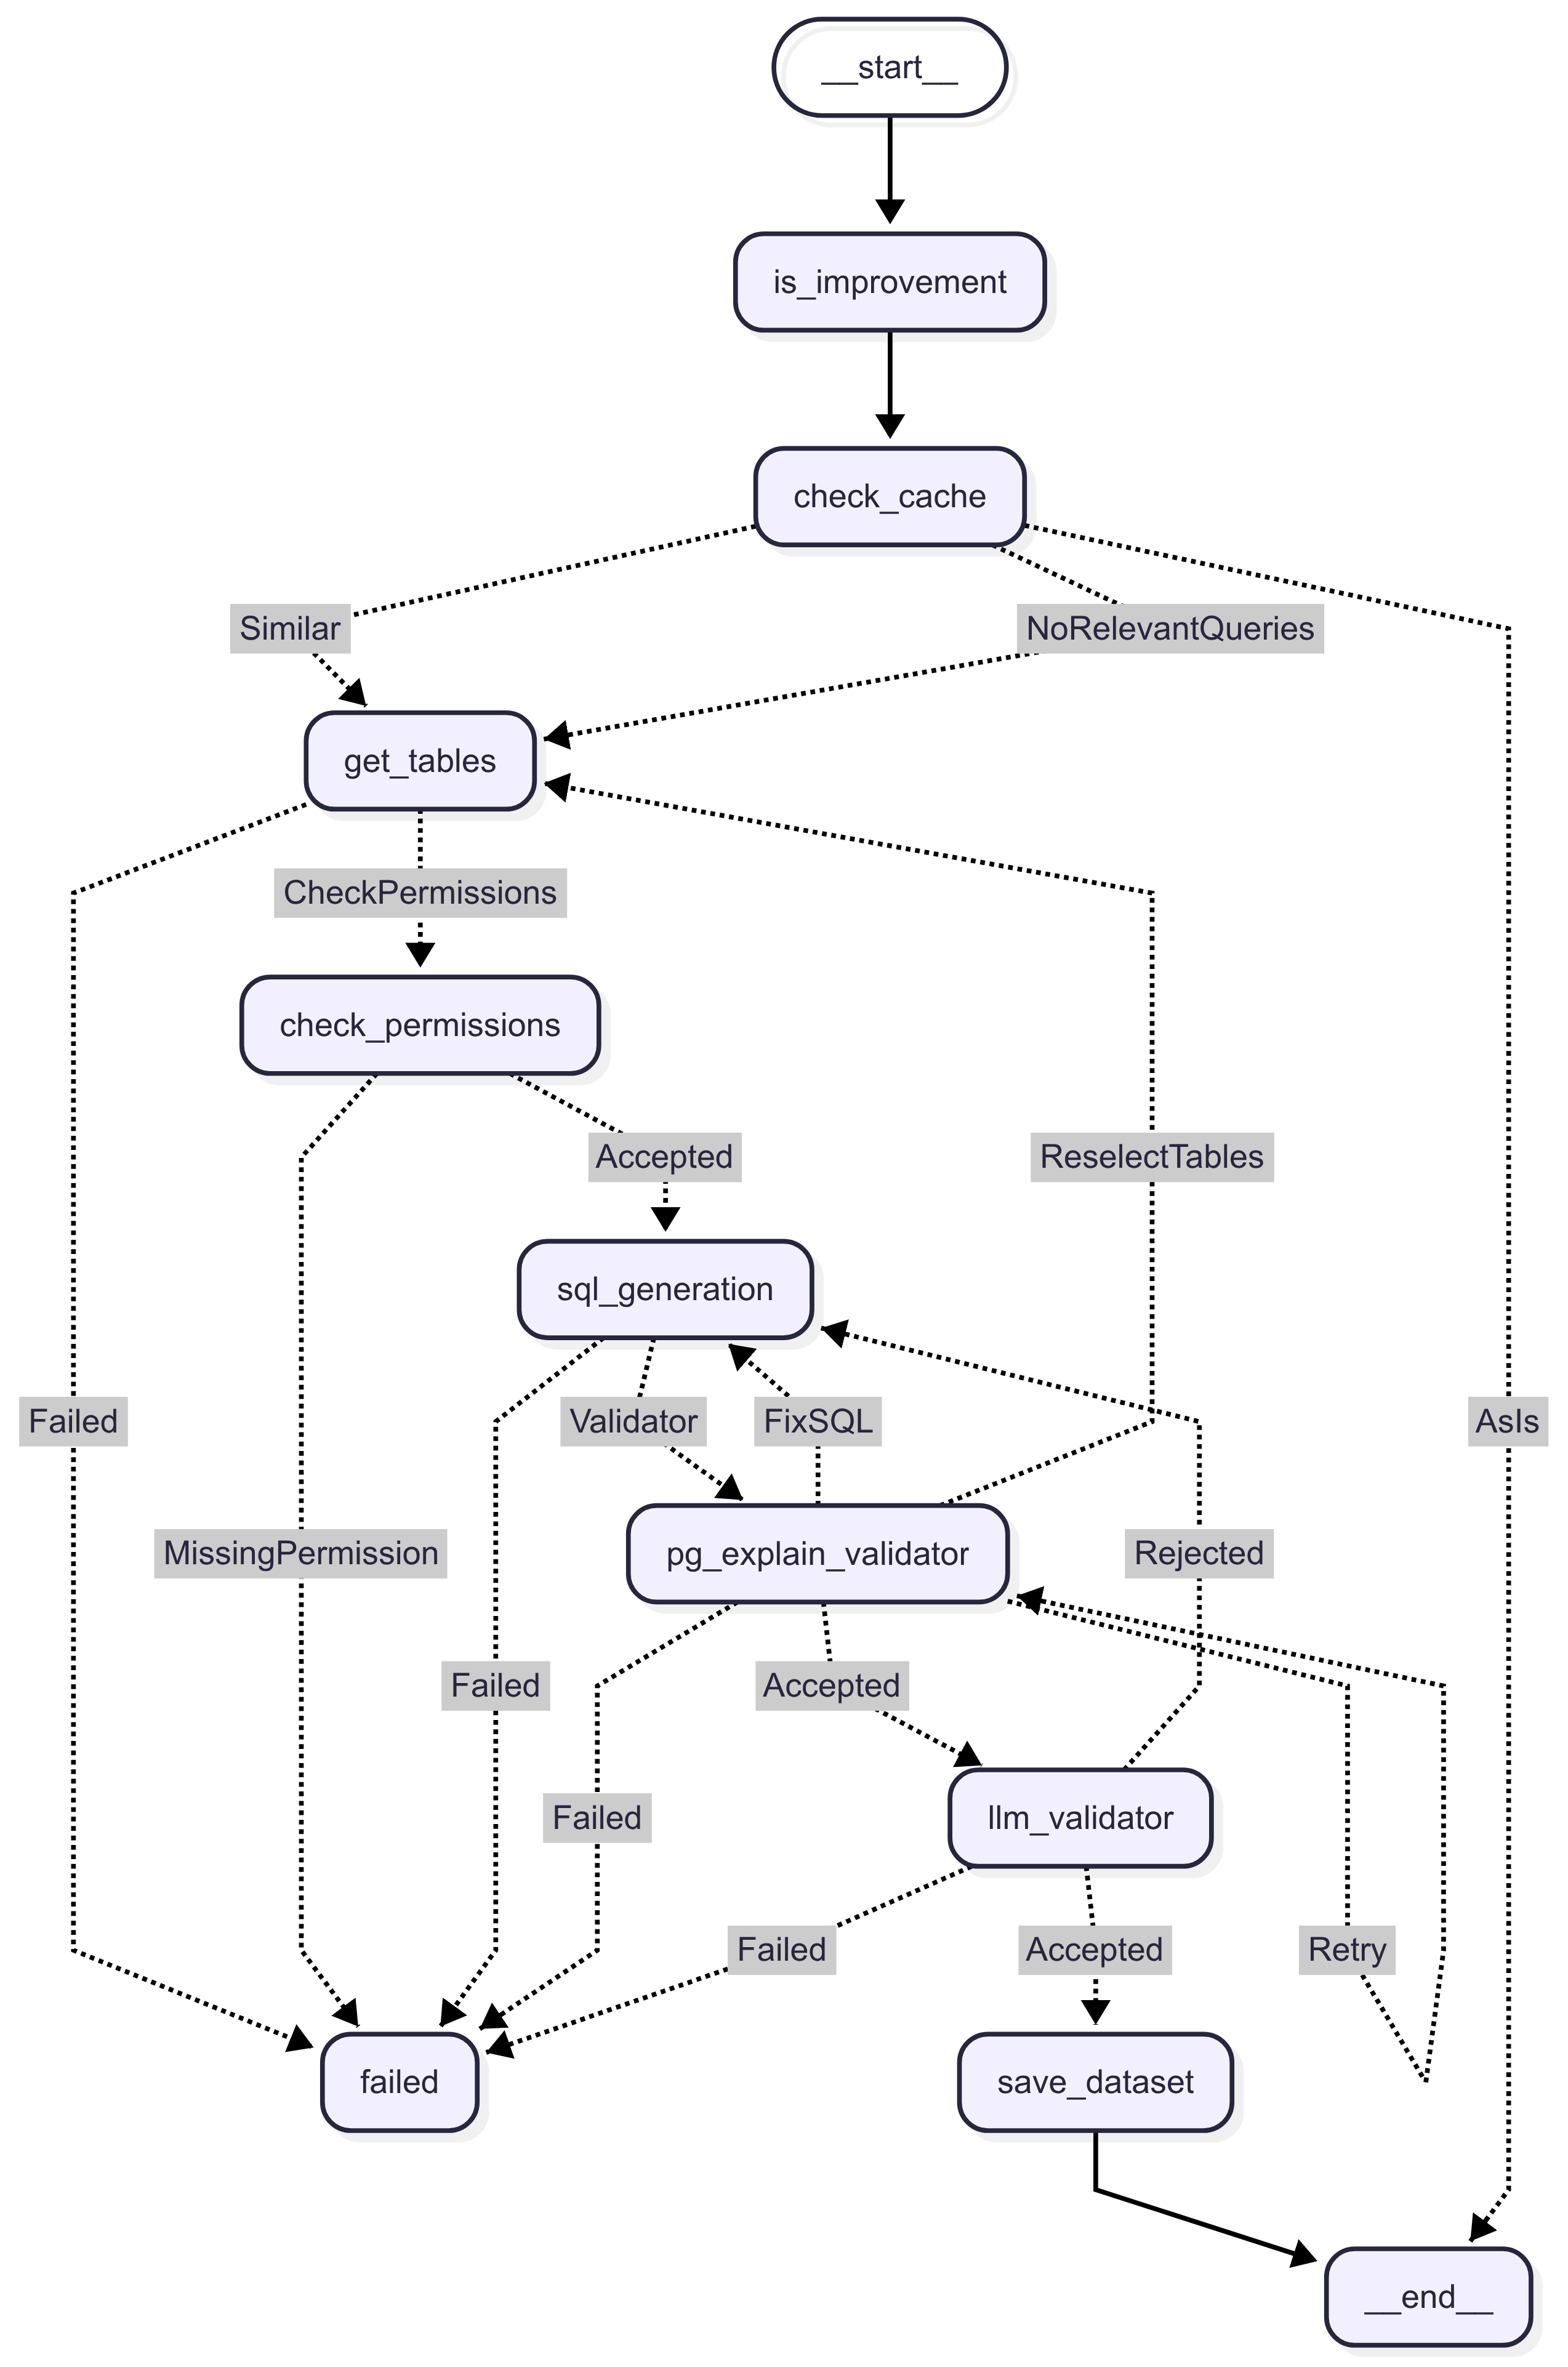
The VisualizerComponent extends the LLM Chat functionality by providing intelligent data visualization capabilities. This component automatically generates charts and graphs based on database query results, making data insights more accessible and visually appealing.
- Automatic Visualization Selection - The system intelligently selects the most appropriate visualization type based on the data structure and user prompt
- Multiple Chart Types - Supports bar charts, line charts, and pie charts out of the box
- LLM-Powered Configuration - Uses AI to generate optimal chart configurations including axis selection, orientation, and styling
- Seamless Integration - Works directly with datasets generated by the DbQueryComponent
The component includes three built-in visualizers:
- Best for: Comparing values across different categories or showing trends over time
- Configuration: Automatically determines category column (x-axis) and value column (y-axis)
- Options: Supports both vertical and horizontal orientations
- Best for: Displaying trends and changes over time
- Configuration: Optimized for time-series data and continuous variables
- Best for: Showing proportions and percentages of a whole
- Configuration: Automatically identifies categorical data and corresponding values
import {VisualizerComponent} from 'lb4-llm-chat-component';

export class MyApplication extends BootMixin(
  ServiceMixin(RepositoryMixin(RestApplication)),
) {
  constructor(options: ApplicationConfig = {}) {
    // Add the visualizer component
    this.component(VisualizerComponent);

    // ... other configuration
  }
}The component provides a generate-visualization tool that can be used by the LLM to create visualizations:
- Input: Takes a user prompt and dataset ID from a previously generated query
- Process: Automatically selects the best visualization type and generates optimal configuration
- Output: Renders the visualization in the UI for the user
- User asks: "Show me sales by region as a chart"
- LLM uses
generate-querytool to create a dataset with sales data by region - LLM uses
generate-visualizationtool with the dataset ID - System selects bar chart as the most appropriate visualization
- Chart is rendered with regions on x-axis and sales values on y-axis
The visualization process follows a structured graph workflow (src/components/visualization/visualization.graph.ts:9):
- Get Dataset Data - Retrieves the dataset and query information
- Select Visualization - Chooses the most appropriate chart type based on data structure
- Render Visualization - Generates the final chart configuration and displays it
You can extend the system with custom visualizers by implementing the IVisualizer interface (src/components/visualization/types.ts:4):
import {visualizer} from 'lb4-llm-chat-component';
import {IVisualizer, VisualizationGraphState} from 'lb4-llm-chat-component';

@visualizer()
export class CustomVisualizer implements IVisualizer {
  name = 'custom-chart';
  description = 'Description of when to use this visualizer';

  async getConfig(state: VisualizationGraphState): Promise<AnyObject> {
    // Generate configuration based on the data and user prompt
    return {
      // your custom chart configuration
    };
  }
}The visualizer component automatically registers all available visualizers and makes them available to the LLM. No additional configuration is required for basic usage. You can register a new visualizer using the @visualizer decorator on a class following the IVisualizer interface.
The visualizer component works seamlessly with the DbQueryComponent:
- Use database query tools to generate datasets
- The visualization tool automatically accesses dataset metadata including:
- SQL query structure
- Query description
- User's original prompt
- This context helps generate more accurate and relevant visualizations
There are two ways to provide context to the LLM -
Global context can be provided as an array of strings through a binding on key DbQueryAIExtensionBindings.GlobalContext. This binding can be a constant or come through a dynamic provider, something like this -
export class ChecksProvider implements Provider<string[]> {
  constructor(
    @repository(CurrencyRepository)
    private readonly currencyRepository: CurrencyRepository,
  ) {}
  async value(): Promise<string[]> {
    return [`Current date is ${new Date().toISOString().split('T')[0]}`];
  }
}
in application.ts -
...
this.bind(DbQueryAIExtensionBindings.GlobalContext).toProvider(ChecksProvider);
...Each model can have associated context in 3 ways -
@model({
  name: 'employees', // Use plural form for table name
  settings: {
    description: 'Model representing an employee in the system.',
    context: [
      'employee salary must be converted to USD, using the currency_id column and the exchange rate table',
    ],
  },
})
export class Employee extends Entity {
  ...
  @property({
    type: 'string',
    required: true,
    description: 'Name of the employee',
  })
  name: string;

  @property({
    type: 'string',
    required: true,
    description: 'Unique code for the employee, used for identification',
  })
  code: string;

  @property({
    type: 'number',
    required: true,
    description:
      'The salary of the employee in the currency stored in currency_id column',
  })
  salary: number;
  ...
}- Model description - this is the primary description of the model, it is used to select model for generation, so it should only define the purpose of the model itself.
- Model context - this is secondary information about the model, usually defining some specific details about the model that must be kept in mind while using it. NOTE - These values should always include the model name. This must be information that is applicable to overall model usage, or at least to multiple columns, and not related to any single field of the model.
- Property description - this is the description for a property of a model, providing context for the LLM on how to use and understand a particular property.
You just need to register your models in the configuration of the component, and if the Models have proper and detailed descriptions, the tools should be able to answer the user's prompts based on those descriptions.
this.bind(DbQueryAIExtensionBindings.Config).to({
  models: [
    {
      model: Employee, // A normal loopback4 model class with proper description
      readPermissionKey: '1', // permission key used to check access for this particular model/table
    },
  ],
  db: {
    dialect: SupportedDBs.PostgreSQL, // dialect for which the SQL will be generated.
    schema: 'public', // schema of the database in case of DBs like Postgresql
    ignoredColumns: ['deleted'], // list of db column names that will be ignored for query generation (Do not use Loopback field names in this list)
  },
  readAccessForAI: false, // give access of the query result to the llm
  maxRowsForAI: 0, // number of rows from the result that are passed to the LLM
  columnSelection: false // add a column selection step in generation in case you have tables with a lot of columns.
});The package comes with 3 connectors by default -
- PgConnector - basic connector for PostgreSQL databases
- SqlLiteConnector - basic connector for SQLite databases, can be used for testing
- PgWithRlsConnector - Connector for PostgreSQL databases with support for Row Security Policies. Refer
PgWithRlsConnectorfor more details.
You can write your own connector by following the IDbConnector interface and binding it on DbQueryAIExtensionBindings.Connector.
By default, the package binds PgWithRlsConnector but if you are not planning to use row security policies or default conditions, you can bind PgConnector -
// application.ts
this.bind(DbQueryAIExtensionBindings.Connector).toClass(PgConnector);The package allows binding an optional provider on key DbQueryAIExtensionBindings.DefaultConditions that are applied on every query generated by the LLM. NOTE This only works for connectors that support this option.
As of now, the only provider that supports this is PgWithRlsConnector.
You can take advantage of the DbQueryAIExtensionBindings.DefaultConditions by using this connector with a PostgreSQL database. To use this you need to first setup your database to use Row Security Policies. You can use an SQL script that looks something like this to do this -
DO $$
DECLARE
    tbl text;
    tables text[] := ARRAY[
        'main.test-table',
    ];
BEGIN
    FOREACH tbl IN ARRAY tables LOOP
        -- Enable RLS
        EXECUTE format('ALTER TABLE %I ENABLE ROW LEVEL SECURITY;', tbl);

        -- Drop existing policy if it already exists (to avoid duplicates)
        EXECUTE format('DROP POLICY IF EXISTS tenant_policy ON %I;', tbl);

        -- Create policy (applies to SELECT, INSERT, UPDATE, DELETE)
        EXECUTE format($f$
            CREATE POLICY tenant_policy ON %I
            -- conditions to apply by default are tenant id = some value and deleted = false
            USING (tenant_id = current_setting('app.current_tenant')::int AND deleted = false)
            WITH CHECK (false);
        $f$, tbl);
    END LOOP;
END$$;
Once the policies are setup, you can bind the provider for DbQueryAIExtensionBindings.DefaultConditions -
// default-conditions.provider.ts
import {IAuthUserWithPermissions} from '@sourceloop/core';
import {AuthenticationBindings} from 'loopback4-authentication';
import {AnyObject} from '@loopback/repository';
import {Provider} from '@loopback/core';

class DefaultConditionsProvider implements Provider<AnyObject> {
  constructor(
    @inject(AuthenticationBindings.CURRENT_USER)
    private readonly user: IAuthUserWithPermissions,
  ) {}
  value() {
    return {
      tenant_id: this.user.tenantId,
    };
  }
}
// application.ts
this.bind(DbQueryAIExtensionBindings.DefaultConditions).to(
DefaultConditionsProvider,
);You can register your own tools by simply using the @graphTool() decorator and implementing the IGraphTool interface. Any such class would be automatically registered with the /generate endpoint and the LLM would be able to use it as a tool.
Since v5.x, build() returns a plain GraphTool object ({name, description, schema, invoke}) instead of a LangChain tool() — the component converts it to an AI SDK tool internally. schema is a Zod schema (or a JSON schema object) and invoke receives the parsed arguments.
import z from 'zod';
import {
  graphTool,
  GraphTool,
  IGraphTool,
  RunnableConfig,
} from 'lb4-llm-chat-component';

@graphTool()
export class AddTool implements IGraphTool {
  key = 'add-tool';
  needsReview = false;

  async build(_config: RunnableConfig): Promise<GraphTool> {
    return {
      name: this.key,
      description: 'a tool to add two numbers',
      schema: z.object({
        a: z.number(),
        b: z.number(),
      }),
      invoke: (args: {a: number; b: number}) => args.a + args.b,
    };
  }
}The built-in graphs (used by DbQueryComponent and VisualizerComponent) are composed of small dependency-injected classes, each tagged with the @graphNode(<key>) decorator and resolved from the LoopBack context by that key at run time. This is the same seam the package uses to register its own nodes, so a host can replace any single node without forking the component.
The graph resolves exactly one binding per node key — registering two classes for the same key raises Multiple nodes found with key <key>. To override a bundled node, unbind the default and register your own class under the same @graphNode(<key>) key:
import {graphNode, IGraphNode, RunnableConfig} from 'lb4-llm-chat-component';
import {DbQueryNodes} from 'lb4-llm-chat-component'; // the node-key enum

@graphNode(DbQueryNodes.GetTables)
export class MyGetTablesNode implements IGraphNode {
  async execute(state: AnyObject, _config: RunnableConfig) {
    // your custom logic; return the partial state the next node expects
    return {tables: ['public.employees']};
  }
}
// application.ts - remove the bundled node, then register the override
this.unbind('services.GetTablesNode'); // bundled nodes are bound at services.<ClassName>
this.service(MyGetTablesNode); // your @graphNode(DbQueryNodes.GetTables) classCollaborators are constructor-injected, so an override can @inject the same helpers the bundled node uses (for example PermissionHelper, the schema store, or the resolved model tiers). The available node keys live in the exported DbQueryNodes (and the visualization node enum).
On v4.x (LangChain based) LangSmith worked out-of-the-box just by setting the LangSmith env variables. From v5.x the LangChain runtime is gone, so LangSmith is wired through the AI SDK telemetry channel instead - install the langsmith package, bind the LangsmithComponent and set LANGSMITH_TRACING=true.
- install the package -
npm i langsmith- add the component in your LB4 application -
import {LangsmithComponent} from 'lb4-llm-chat-component/langsmith';
...

this.component(LangsmithComponent);- set up the env -
export LANGSMITH_TRACING=true
export LANGSMITH_API_KEY="lsv2_..."
export LANGSMITH_PROJECT="your-project"
Refer this for more details on the available env variables.
You can enable Langfuse based tracing with the following steps -
- install the following packages -
npm i @langfuse/tracing @langfuse/otel- adding the following component in your LB4 application -
import {LangfuseComponent} from 'lb4-llm-chat-component/langfuse';
...

this.component(LangfuseComponent);- set up langfuseSpanProcessor -
import {LangfuseSpanProcessor} from '@langfuse/otel';
import {OTLPTraceExporter} from '@opentelemetry/exporter-trace-otlp-http';
import {DnsInstrumentation} from '@opentelemetry/instrumentation-dns';
import {HttpInstrumentation} from '@opentelemetry/instrumentation-http';
import {PgInstrumentation} from '@opentelemetry/instrumentation-pg';
import {
  defaultResource,
  resourceFromAttributes,
} from '@opentelemetry/resources';
import {NodeSDK} from '@opentelemetry/sdk-node';
import {BatchSpanProcessor, SpanProcessor} from '@opentelemetry/sdk-trace-base';
import {
  ATTR_SERVICE_NAME,
  ATTR_SERVICE_VERSION,
} from '@opentelemetry/semantic-conventions';
import * as dotenv from 'dotenv';
import * as dotenvExt from 'dotenv-extended';

dotenv.config();
dotenvExt.load({
  schema: '.env.example',
  errorOnMissing: true,
  includeProcessEnv: true,
});

if (!!+(process.env.ENABLE_TRACING ?? 0)) {
  const resource = defaultResource().merge(
    resourceFromAttributes({
      [ATTR_SERVICE_NAME]: process.env.SERVICE_NAME ?? 'reporting-service',
      [ATTR_SERVICE_VERSION]: process.env.SERVICE_VERSION ?? '1.0.0',
    }),
  );

  const spanProcessors: SpanProcessor[] = [];
  const instrumentations = [];

  // Add OTLP exporter if Jaeger endpoint is configured
  if (process.env.OPENTELEMETRY_HOST && process.env.OPENTELEMETRY_PORT) {
    const otlpExporter = new OTLPTraceExporter({
      url: `http://${process.env.OPENTELEMETRY_HOST}:${process.env.OPENTELEMETRY_PORT}/v1/traces`,
    });
    spanProcessors.push(new BatchSpanProcessor(otlpExporter));
    instrumentations.push(
      new HttpInstrumentation(),
      new DnsInstrumentation(),
      new PgInstrumentation(),
    );
  }

  if (process.env.LANGFUSE_BASE_URL) {
    console.log('Langfuse tracing enabled');
    spanProcessors.push(new LangfuseSpanProcessor());
  }

  const sdk = new NodeSDK({
    resource: resource,
    spanProcessors: spanProcessors,
    instrumentations,
  });

  // Initialize the SDK
  console.log('Starting OpenTelemetry SDK');
  sdk.start();

  // Graceful shutdown
  process.on('SIGTERM', () => {
    sdk
      .shutdown()
      .then(() => console.log('Tracing terminated'))
      .catch(error => console.log('Error terminating tracing', error))
      .finally(() => process.exit(0));
  });
}- setup env -
export ENABLE_TRACING=1
export LANGFUSE_SECRET_KEY="sk-lf-..."
export LANGFUSE_PUBLIC_KEY="pk-lf-..."
export LANGFUSE_BASE_URL="https://cloud.langfuse.com"The generation.acceptance.builder.ts file provides a utility to run acceptance tests for the llm-chat-component. These tests validate the functionality of the /reply endpoint and ensure that the generated SQL queries and their results align with expectations.
This builder facilitates the execution of multiple test cases, each defined with specific prompts, expected results, and configurations. It also generates detailed reports to analyze the performance and correctness of the tests.
- Dynamic Prompt Parsing: Replaces placeholders in prompts with environment-specific values.
- Token Generation: Creates JWT tokens with required permissions for test execution.
- Query Execution: Executes the generated SQL queries and compares the results with expected outputs.
- Detailed Reporting: Generates markdown reports with metrics such as success rates, token usage, and execution times.
import {generationAcceptanceBuilder} from './generation.acceptance.builder';To use the builder, define your test cases as an array of GenerationAcceptanceTestCase objects and pass them to the generationAcceptanceBuilder function along with the required parameters.
const testCases = [
  {
    case: 'Test Case 1',
    prompt: 'Find all the active resources',
    outputInstructions:
      'The output should have a single column `resource_name` arranged in alphabetical order.',
    resultQuery:
      'SELECT name as resource_name FROM resource WHERE status = 1 ORDER BY name',
    count: 1,
  },
];

const result = await generationAcceptanceBuilder(
  testCases,
  client,
  app,
  1,
  true,
);
console.log(result);cases: An array of test cases to execute.client: The LoopBack test client.app: The LoopBack application instance.countPerPrompt: Number of iterations per test case (default: 1).writeReport: Whether to generate a markdown report (default: false).
Each test case should follow the GenerationAcceptanceTestCase interface:
interface GenerationAcceptanceTestCase {
  case: string; // Name of the test case
  prompt: string; // Prompt to send to the LLM
  outputInstructions: string; // Additional instructions for the output
  resultQuery: string; // Expected SQL query
  count?: number; // Number of iterations (optional)
  only?: boolean; // Run only this test case (optional)
  skip?: boolean; // Skip this test case (optional)
}The builder generates a markdown report summarizing the test results. The report includes:
- Success metrics
- Time metrics
- Token usage metrics
- Detailed results for each test case
- Failed queries with actual and expected results
The report is saved in the llm-reports directory with a filename based on the model name.
The builder relies on the following environment variables:
SAMPLE_DEAL_NAME: Default value for<testDeal>placeholder.TEST_TENANT_ID: Tenant ID for token generation.JWT_SECRET: Secret key for signing JWT tokens.JWT_ISSUER: Issuer for JWT tokens.
@loopback/testlab@loopback/core@loopback/repository@sourceloop/corejsonwebtokencryptofs